Andys Handcuff Collection
"Making Of" Andy HS104 V2A
main page
[previous]
[1]
[2]
[3]
[5]
5
[6]
[next]
Assembly and Welding
Now all parts are finished, ready for assembly. Figure 19 shows all parts needed for one
single cuff.
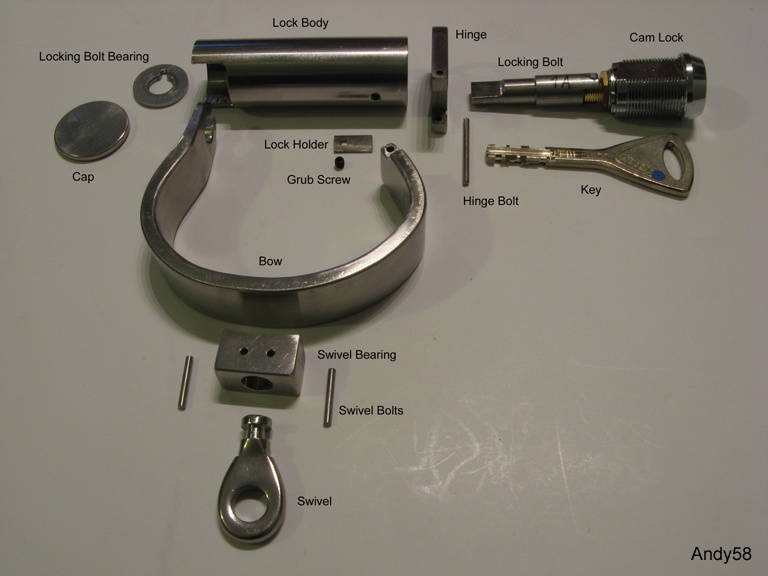
Figure 19: parts
Most parts had to be welded together. There is a little space under stair to cellar which i use
for welding (figure 20)
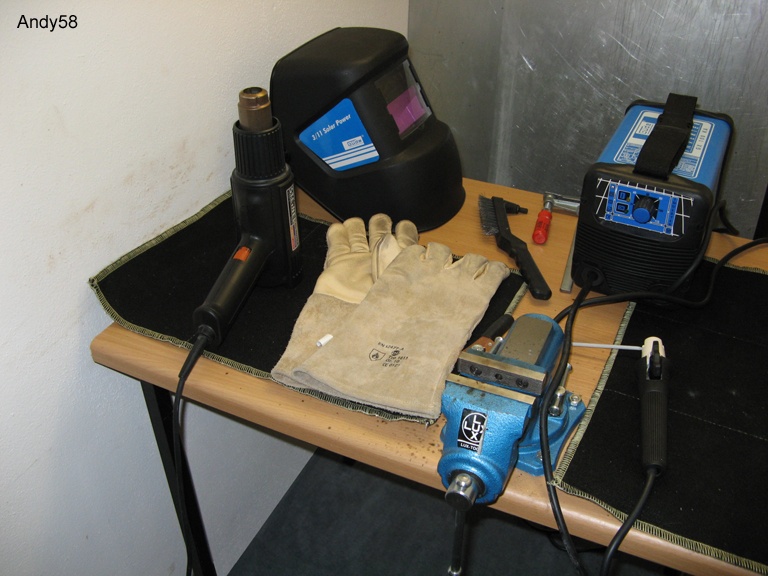
Figure 20: welding place
On right side the so called inverter, it is an electronic welding transformer. It is working similar
to a switched power supply like in PCs but of course much more power and absolutely short circuit
resistant. It is a DC unit, so welding is easier and smoother as with older AC transformers. This
inverter is placed under table during working, it was just on table for taking photo.
Left on rear side is an automatic welding shield. Glass darkens automatically by solar cell when
electric arc is active. So you can see what is happening before ignition and you need not ignite
electric arc totally blind. This is very helpful for someone with only a few weeks of welding
practice.
There Ground cable of inverter is connected to bench vise, so i need not connect cable to workpiece
(danger of scratches, less good contact). Not shown are aluminium inserts for bench vise to prevent
scratches and deforming of workpieces.
There are special electrodes for welding stainless steel. They are much more expensive than electrodes
for normal steel and it is more difficult to ignite them. Bigger electrodes with about 60A current will
ignite reasonably, but the thin ones for welding small points at ca. 30A will not ignite at all. Some
tips and some experiments later i had a solution: pre-heating electrode and workpiece by heat gun
(front left on table just for photo, during work it is resting on floor when not in use). I am using
it at maximum power for about one minute, then switching off heat gun, switching on inverter and start
welding. Never switch on heat gun and inverter at the same time, there is danger of short circuit
inverter by heat gun (and destroying heat gun, perhaps also inverter) and current consumption of both
is too much for the fuse.
Welding is dangerous. Always wear safety gloves for welding. Not shown is protective clothing for body,
absolute minimum are gloves, apron and a nonflammable shirt, much better are gloves, jacket and trousers.
Never forget shoes made of leather. During welding very hot tiny pieces of liquid metal are flying
around, you have to protect your body and remove all inflammable things around area of welding.
At first the tiny lock holders are screwed in place inside tube by using a normal screw (not a grub
screw) and welded. This guarantees that later grub screws fits through holes in tubes. Hinges are
fitted over tubes and welded at three points. Figure 21 shows hinge just after welding, after grinding,
after polishing and with inserted cam lock to show visible parts after assembly (from left to right).
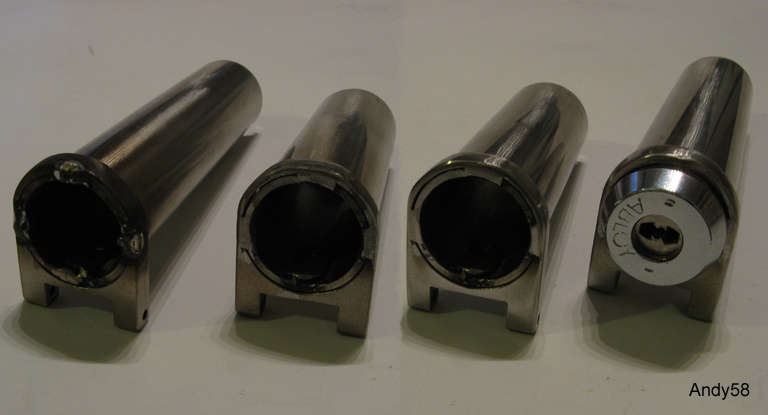
Figure 21: welding hinge
Welding swivel bearings are done with thicker electrode and more current (ca. 60A). This welded seam has
to resist great forces. After welding i have done a static load test (figure 22). I have inserted locks
inside tubes, connected bows to hinges and closed cuffs. Two cuffs are connected by a padlock through
swivels. For applying force i have used my special bending construction, on cuff around end bar, the
other cuff connected by chain and second padlock to a bar near hinge. Pulling at lever multiplies force
by factor 14. Applying force is done by spring scale. I have pulled with about 25kp (ca. 55 pound), so
cuffs are tested with ca. 350kp = 3500N (ca. 750 pound). This is more than static load test according
to Nij...
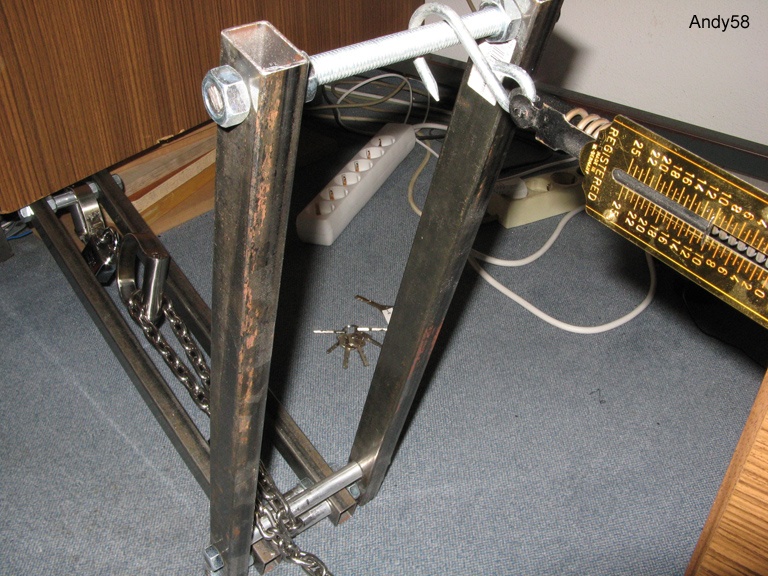
Figure 22: static load test
Weakest part were the swivels, they are bent a little bit but not broken. I think, the parts for boats
from which swivels are made were from less strong stainless steel as other parts. Welded seams, bow
and locking bolt are much stronger.
After inserting locking bolt bearing (the parts made from washers) and welding it in place, it is time
to make the pullout protection. Cam lock and locking bolt are permanently fixed together, but are
inserted into lock body and fixed by grub screw. Removing lock by unscrewing should of cause only
be possible when lock is opened by key. The hole in locking bolt bearing has a little nut, at the
side of locking bolt is a tiny pin protruding 2mm outside. This pin aligns to nut when lock is open,
figure 23 shows position when locked.
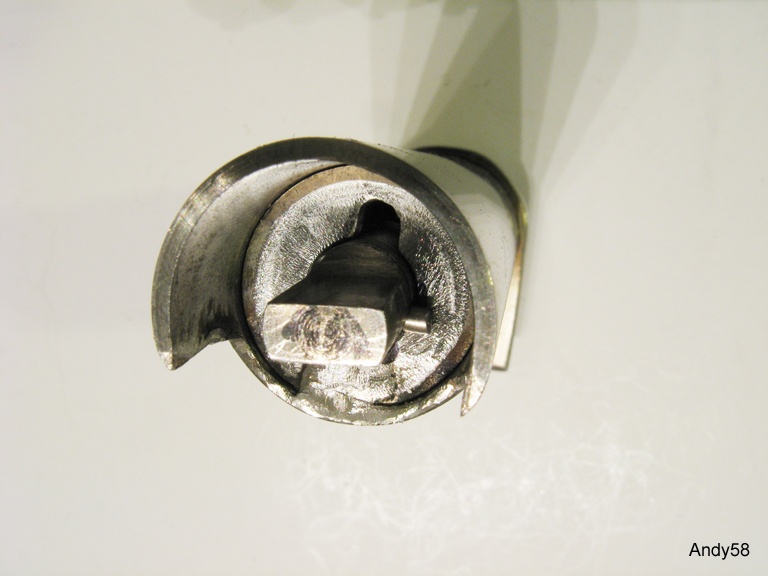
Figure 23: pull out protection
With locking bolt bearing in place i had the exact position of tiny pin for pullout protection. Because
welding is not very exactly, i had to wait until now to make pullout protection. After marking position
by permanent marker a punch marking is not enough because hole starts at a curved surface (side of round
locking bolt). Drill will "run away" until it is drilling deeper at final position. I have done a deeper
marking by milling machine. Then 2mm hole is drilled about 4mm in depth. 2mm steel rod is cut to a
length of ca. 8mm. One end is deformed a little bit by bench vise, then inserted by force into hole.
So pins are safely connected without welding, then they are cut to final length of 2mm outside.
Now caps are placed on lock bodies and welded. Figure 24 shows caps direct after welding, after grinding
and after polishing. Grinding and polishing needs a long time until surface looks somewhat smooth. Not
perfect, but i hope good enough for hand crafting.
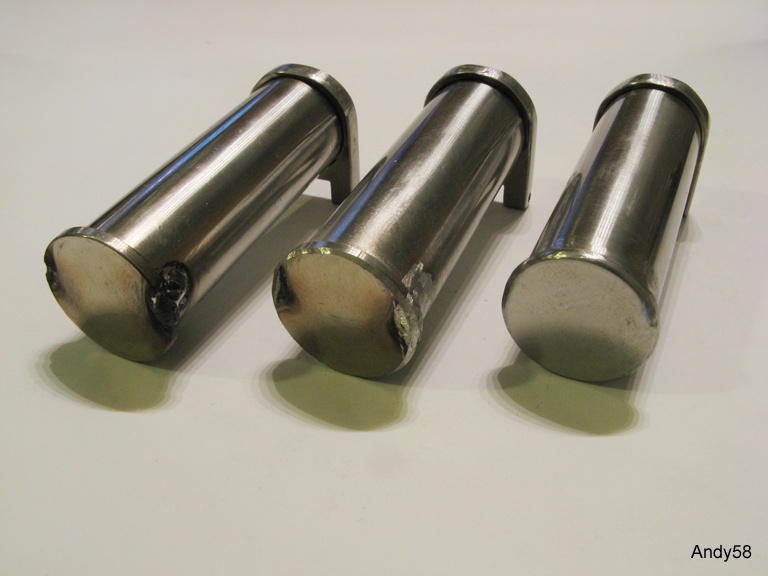
Figure 24: welding caps
Finally rings (for handcuffs) or chain (for legcuff) are welded inside swivels. Bows are inserted into hinges,
swivels into swivel bearings and pins for hinges and swivels are fixed by welding points. After grinding and
polishing last welding points serial numbers are inserted by milling machine, punching numbers by hand is
not possible for hard stainless steel, especially because position of serial numbers are grinded welding
points.
After seven months, work has finished!
[previous]
[1]
[2]
[3]
[5]
5
[6]
[next]